Monday, 20 January 2020

9 Insta­gram Pri­va­cy Set­tings That You Should Know

9 Insta­gram Pri­va­cy Set­tings That You Should Know

MEHVISH

In the age of social media where we love to post every single detail of our lives online, privacy plays an important role. All social networks and chat apps offer a bunch of privacy settings, however, very few people utilize them.
Instagram Privacy Settings 21
Since Instagram is all about photos and videos, it’s necessary to tweak a few privacy settings for a better experience. Here you will find nine such Instagram settings.

1. PRIVATE PROFILE

This is the most popular privacy setting. By default, Instagram accounts are public, meaning, anyone on Instagram can view your photos, like and comment on them. But, thankfully, it gives you an option to make your profile private.
When you have a private profile, only your followers can see your published photos and stories. This doesn’t change your viewing method, as you can still see other public profiles' photos and stories.
To make your profile private, follow the steps:
Step 1: Open the Instagram app and go to the profile screen. Then tap on the three-dot icon at the top-right corner to open Settings in case of Android phones. On iPhone, tap on the gear icon.
Instagram Privacy Settings 1
Step 2: Under Settings, tap on Private account and turn it on.
NOTE: Alternatively, tap on Account privacy and enable Private account. For some weird reason, Instagram has kept the same setting in two places.
Instagram Privacy Settings 2

2. REMOVE A FOLLOWER

When you make your profile private, there will be many people in your Followers list that you don’t want there. Earlier, one had to block such users but that has changed now.
Thanks to Instagram, you can now manually remove followers with just one tap. And the best part, they won’t be notified about it. It’s not necessary that you should have a private profile to remove followers, you can do this even if you have a public profile.
To remove followers, do this:
Step 1: Go to your profile and tap Followers.
Instagram Privacy Settings 3
Step 2: You will see the three-dot icon next to every follower. Tap on it for the follower you'd like to remove and select Remove.
Instagram Privacy Settings 4A
Instagram Privacy Settings 5

3. TURN OFF ACTIVITY STATUS AND GREEN DOT

Few months back, Instagram launched the dreadful Activity status feature. Basically, it shows the last active time of people on Instagram with whom you have had direct conversation. If that wasn’t enough, recently they introduced the online status indicator. When a person is online, you will see a green dot next to their name in Direct Messages (DM).
Here are the steps to turn them off.
Step 1: Go to your profile and tap the three-dot icon or the gear icon.
Instagram Privacy Settings 6
Step 2: Scroll down and tap on Activity status. On the next screen, disable Show activity status. This will turn off activity status and green dot both.
Instagram Privacy Settings 7
Instagram Privacy Settings 8

4. BLOCK COMMENTS

Sometimes when people don’t like a picture or video that you posted, they resort to trolling in the comments. If you want, Instagram gives you the option to turn off comments. You can do this for all posts from the general Settings and even for an individual post.
Here’s what you need to do to stop comments on all posts.
Step 1: On your profile, tap on the gear (iPhone) or three-dot icon (Android) to go to Settings.
Step 2: Under Settings, tap on Comment controls. Then you will get two options: Allow Comments from and Block Comments from.
Instagram Privacy Settings 9
Instagram Privacy Settings 10
You can use the first option to white-filter the comments. Meaning, only the people that you add here will be able to comment on your posts. On the other hand, when you block people from commenting, everyone else except these users will be able to comment.
Instagram Privacy Settings 11
To turn off comments for an individual post, open the post and tap the three-dot icon at the top-right corner. Select Turn off commenting.

5. STOP DIRECT MESSAGES (DM)

Everyone on Instagram can message you, whether they follow you or not. However, messages from people other than your followers are kept under a separate folder (Requests) in DM.
While Instagram doesn’t let you stop DMs for normal messages, you can restrict DM for stories. Instagram offers three settings for message replies in stories: Everyone, People you follow, and Off.
Here’s how to set it.
Step 1: Open Instagram Settings by tapping the three-dot icon (Android) and gear icon (iPhone) on the profile screen.
Instagram Privacy Settings 11A
Step 2: Tap on Story controls and under Allow message replies, select the preferred option.
Instagram Privacy Settings 12
Instagram Privacy Settings 13

6. DISABLE RESHARING POSTS TO STORIES

If you have a public profile, people can reshare your posts on their stories along with your username. While some people may not have an issue with it, if you aren’t happy with this feature then you can turn it off.
To do so, follow the steps:
Step 1: Open Instagram Settings.
Instagram Privacy Settings 14
Step 2: Scroll down and hit Resharing to stories. Then disable it on the next screen.
Instagram Privacy Settings 15
Instagram Privacy Settings 16

7. HIDE STORY

Instagram offers different privacy settings for posts and stories. While you cannot change the privacy of individual posts, you can customize the privacy of stories. That is, you can hide stories from specific followers.
In order to hide stories, follow the steps:
Step 1: Launch Instagram Settings and tap on Story Controls.
Instagram Privacy Settings 17
Instagram Privacy Settings 18
Step 2: Select the followers from whom you want to hide stories under the Hide story from option.
Instagram Privacy Settings 19

8. APPROVE TAGGED POSTS

Instagram has a separate section for tagged photos and videos. When a person tags you, it will be added automatically to your profile.
Now we all know that tagged pictures aren’t good always. So it’s better to approve tagged posts first. Once you approve them, only then they will be added to your profile.
To enable this setting, do this:
Step 1: Under Instagram Settings, tap on Photos of you.
Instagram Privacy Settings 19A
Step 2: Disable the Add Automatically option.
Instagram Privacy Settings 20
NOTE: You can also hide your existing tagged posts using the Hide photos setting present under Photos of you.

9. CLEAR SEARCH HISTORY

If you frequently search for a person or a hashtag, it will then appear under the search tab. To remove these results, you have to clear the search history.
To do so, open Instagram Settings and tap on Search history. Then on the next screen, tap on Clear search history.
Clear Instagram Search History Permanently 2
Clear Instagram Search History Permanently 3
Sometimes, even after clearing the search history, previous search queries are still visible. Here’s how to fix that.

SAY HELLO TO PRIVACY

As one of the quotes goes, 'Not everyone needs to know everything about you', this stands true for social media. So we should use the privacy settings offered to us by Instagram to our best use.

How do I turn off my activity status on Instagram?

How do I turn off my activity status on Instagram?

People you follow or have direct conversations with can see when you were last active on Instagram. You can change the visibility of your activity status at any time.
To change the visibility of your activity status:

On the Instagram app for iOS or Android devices

  1. Go to your profile and tap .
  2. Tap Settings > Privacy > Activity Status.
  3. Tap  next to Show Activity Status to turn off your activity status.

On your computer or mobile browser

  1. Go to instagram.com on your computer or mobile browser.
  2. Click  and then click .
  3. Click Privacy and Security and then click to uncheck the box next to Show Activity Status.
Keep in mind that when you turn off your activity status, you won't be able to see anyone else's.

How to Disable Online Activity Status on Instagram to Stop Showing When You’re Using the App

How to Disable Online Activity Status on Instagram to Stop Showing When You’re Using the App

Jan 21, 2018 - 9 Comments
Instagram icon
Instagram now defaults to showing other peoples accounts when you were last active using the Instagram application. For example, if you’re using Instagram right now then other Instagram users will be able to see that you are using the app at that moment. If you used the app exactly 23 minutes ago, other users can see that too.
Some Instagram users may enjoy broadcasting to the world when exactly they are using that specific application. On the other hand, privacy advocates and more casual Instagram users may not appreciate the broadcasting of app usage to other Instagram users.
If you want to disable the Activity Status feature on Instagram so that nobody will be able to tell when you were last using the Instagram app, we’ll show you how to do it.

How to Disable Instagram Broadcasting Online Status Activity

You may need to update the Instagram app to the latest version to find the Activity Status setting available:
  1. Open the Instagram app and tap on your profile icon in the bottom corner
  2. Now tap on the Settings icon found on your profile page, it looks like a little gear
  3. Open Instagram settings
  4. Scroll down through Options to find “Show Activity Status” and toggle that setting OFF
  5. Disable Instagram activity status online status broadcasting
  6. Exit Settings and use Instagram as usual
With “Show Activity Status” disabled you will no longer broadcast when you were last using the Instagram app to anyone you follow or to anyone you communicate with in the Instagram app.
In case you’re not sure what this is referring to or you want a visual example, the following sort of “Active now” and “Active 27m ago” online status indicators as shown in the screen shot below will no longer appear:
How to disable Instagram online activity broadcasting
One side effect of disabling Show Activity Status in Instagram is that Instagram/Facebook has made it so that if you disable the feature you also won’t be able to see other peoples activity status on their accounts either, but that’s probably not much of a loss to most users unless you’re obsessed with knowing when other people are or aren’t using the social media image sharing app.
Note this setting is enabled per Instagram account, meaning if you use multiple Instagram accounts that you switch between you will need to disable the setting for each account individually.
Likely the case with many Instagram users, I was not aware of this ‘feature’ broadcasting my personal app usage and online history to other Instagram users, but once I discovered it I immediately turned the capability off since I value and prioritize privacy but don’t want to delete the account. But to each their own. Thanks to our friends at iPhoneInCanada for the tip.
Oh and by the way, this is obviously for iPhone but likely applies exactly the same to Android Instagram users too.

Set options for online meetings and conference calls

Set options for online meetings and conference calls

When scheduling online meetings, you can use the Meeting Options dialog box to help you determine who should wait in the lobby before being admitted to the meeting, who should have presenter privileges during the meeting, and the level of participation allowed for meeting attendees.
If you are scheduling an online meeting with people outside your organization or if it is expected for the meeting information to be shared with a large number of people, it is recommended that you change the “These people don’t have to wait in the lobby” option from “Anyone (no restrictions)” to “Anyone from my organization” in order for the presenter(s) to be able to moderate who is admitted to the meeting.
Note: These options apply to users joining an online meeting using Skype for Business or dialing in using their phones.

Where do I set online meeting options?

Start in Outlook
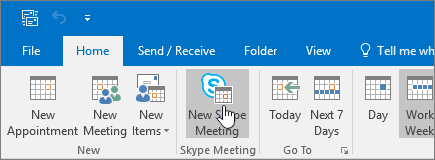
  1. From your Outlook calendar, click New Skype Meeting.
    Outlook New Skype Meeting button
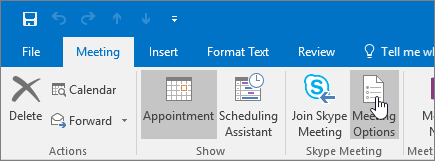
  2. In the meeting window, click Meeting Options.
    Outlook Meeting Options button

These people don't have to wait in the lobby

The lobby is a virtual place where attendees wait to be admitted to your meeting. Options are:

Online safety - How to set up parental controls - Webwise

Parental Controls
Parental controls are available on most Internet-enabled devices including computers, smartphones, tablets and gaming systems. Parental controls can help reduce the risk of your child encountering inappropriate content when they are online. When enabling parental controls, use age-appropriate settings to filter, monitor and block your child’s activities. We recommend using parental controls especially for younger children all available devices, computers, and tablets in the home.

Parents should also understand that while parental controls are a good support, they are not 100% effective, therefore it is also very important to talk to your child about using the internet safely.

What can Parental Controls do?

It is important to be aware of the range of parental controls available. They are usually offered by internet service providers, computer operating systems, social networks, search engines, games consoles and more. They also offer different functions depending on the provider, these include:
  • Setting specific time limits on your children’s use
  • Controlling/Blocking games your child can access
  • Prevent children from using specific programs
  • Manage content children can search for online

Parental Controls from your Internet Service Provider

Setting Parental Controls through your internet service provider can be the easiest way to manage what your children can access across all your devices and computers in your home. This can be done easily and normally for free by most internet service providers. We recommend contacting your provider or checking their website for more information. Please note if your child has a smartphone they use outside the home, you should also consider putting these controls in place on the device also.

Parental Controls on your Computer Operating System

Most computer systems offer easy to follow steps on setting up parental controls which are free to use. Here are links to some of the main providers:
Windows
Windows Parental Controls allows users to set limits on the amount of time spent on computers, the games users play and the programs they can access. To set these up go to windows.microsoft.com/set-parental-control
Apple
Apple’s Parental Controls filter can operate in 3 modes (unrestricted, automatic and whitelist). Ensure you choose the most appropriate filter for your child. For step by step info on how to set-up, see: https://support.apple.com/en-ie/guide/mac-help/mtusr004/mac
Chrome OS
For Chrome Book users, we recommend setting up Supervised Users. Supervised Users allows you to see what sites/pages the supervised user has viewed and also allows you to block sites you may not want Supervised Users to access. Find out how to set up Supervised Users here: google.ie/safetycenter/families/

Parental Controls on Smartphones and Tablets

Whether your child has access to an Android/Apple smartphone or tablet, parental controls are available across all of these devices. You can turn off functions like in-app purchasing, social networks, app store access, camera access, Bluetooth and more.
Apple
You can use Restrictions to block or limit specific apps and features on your iPhone, iPad, or iPod touch, including access to explicit content in the iTunes Store. For more information on setting up restrictions on Apple devices go to support.apple.com/
Android
This useful guide from PC Advisor gives step by step information on setting up parental controls on Android devices: pcadvisor.co.uk/how-to/
Google Play Store
For Android Phones, we also recommend putting in place controls on the Google Play store.
You can turn on these controls to restrict the content someone can download or purchase from Google Play on your device. Find out how to set up controls on Google Play here: support.google.com/googleplay/

Parental Controls on your Internet Browser

Most internet browsers offer free restrictions to help manage what sites your child can access when online. Find out how to activate parental controls on the most popular internet browsers below.

Parental Controls on Search Engines

Search engines play a big part in what we look at online so it is important to help manage the types of content your child can come across when searching for something online. Most search engines have free controls in place to help parents.

Parental Control on Video Sites

YouTube Safety Mode: Here
YouTube have also recently introduced a free YouTube kids app which may also be worth considering for your child. Find out more about the new app here: webwise.ie/parents/youtube-kids/
Swipe TV
RTÉ have a dedicated channel app which is a great source of video content for children including videos, games, TV shows and more. The app is suitable for primary level children. rte.rte.ie/swipetv/
Netflix
You can control access to certain maturity levels of Netflix content from the Your Account page under Manage Profiles.
Netflix parental controls consist of four maturity levels:
  • Little Kids – Watch movies and TV shows suitable for all ages.
  • Older Kids – Watch movies and TV shows suitable for older kids.
  • Teens – Watch movies and TV shows suitable for teens.
  • Adults – Watch all movies and TV shows, including mature content.
For more info go to: help.netflix.com/264

Parental Controls on Game Consoles

In many households, gaming can be just as popular or even more popular than spending time online, so it is just as important to protect our children when gaming. The most popular consoles all offer free parental controls and easy step by step guides to setting them up.

The first step is simply to get started.

And, planning isn’t hard.
The first step is simply to get started.
Here’s what we’ve covered in terms of planning up to this point to prepare smart entrepreneurs for the next step: actually going live!

1. Decide what to sell.

You have two choices here – commoditized or unique products.
By and large online, unique products sell best. So, find yourself a product niche you are passionate about or one that is trending.
Bonus points if you can manage to find both. Google Trends can help you spot trends. For passion, you’ll have to look deep within yourself.
Reference Chapter 1 for a breakdown with examples of how other entrepreneurs found niche success.

2. Make sure you can actually sell it.

Beyond other people potentially wanting to buy what you are selling (which is another exercise almost entirely), it is important that you consider the challenges in your product niche before you move forward with launching a store.
For instance, have you thought about your product’s weight and size? Sure, you might be able to sell your item for much less than the competition, but will shipping costs obliterate your margins? They will if your item is too big or heavy.
Reference chapter 2 for more information.

3. Get to know other people who are selling it (and already buying it).

Online competition is fierce, and your best offense is a good defense.
Or, rather, your best offense is knowing your competition thoroughly and differentiating yourself in the market.
At this stage of the game, you’ll want to do some keyword research. Then, you’ll want to get a good understanding of your product market and the overall trends driving that market.
Read chapter 3 for more information on how to do this effectively.

4. Analyze what your closest competitors are doing.

Now that you have a better feel for the lay of the land, use this competitive analysis template to get a top level view of your top 10 competitors in the space.
Remember, there are three types of competitors: primary, secondary and tertiary.
You want to have a good eye on each of them. Pinpoint strengths and weakness of each brand. Note where they are selling. All of this will help you to easily find the holes in the market. Those holes are yours to fill.
Reference chapter 4 for more detail.

5. Make sure you aren’t breaking any laws.

Of course, before you begin anything, double check that your business is operating within the confines of the law where you’re selling  — local, state, federal and even international, if applicable.
This applies both before you launch (i.e. can you legally sell that?) and even after you launch (i.e. have you paid the proper taxes?). This can get complicated, and different states have different rules.
Grab yourself some coffee and sit down for a legal lesson in online sales.

6. Identify your market (and your differentiators).

Now that you have your competitive analysis on lockdown, you can easily identify your target market.
This will be the market that is interested in the product, but is currently underserved. You’ll use this targeting in determining your brand look and feel, tone and overall point of view. You want your brand to be the trustworthy confident of these underserved customers in a trending category.
So, speak to them like you are.

7. Source your product.

And once you have all the background information figured out, it is time to source your product.
Will you dropship, make the item in house or use a 3PL? The answer to this is different for every single brand, even within the same selling category. There are benefits and pitfalls to all of your options.
Figure out which one works best for your margins, your sales channel and your customer’s expectations.

8. Choose the right ecommerce solution.

There are a few basic things you need to keep in mind while choosing an ecommerce platform for your business such as necessary functionality, cost and what types of third party integrations are needed.